Please mail me if any: [email protected]
CCBill SDK for Ruby
Unofficial CCBill SDK for Ruby.
This gem provides:
- Interface for URL generation with simple validation
- Postback verification (WebHooks)
- Easy Install
- Getting started guide
- Generator that creates
- Approve/Deny callback path
- Webhook callback path
- Url/Form Generator for test and live mode
Important! CCBill provides two types of payment forms.
FlexForms is our newest (and recommended) system. In this gem we use ONLY FlexForms with DynamiPricing.
Getting started
gem 'ccbill_ruby'
Then run bundle install
Next, you need to run the generator:
$ rails generate ccbill:install
This will create a controller (if one does not exist) and configure it with the default actions. The generator also configures your config/routes.rb file to point to the CCBill controller.
Example of usage:
Single billing transaction:
form = Ccbill::DynamicPricing.new({
  initial_price_in_cents: 355
  initial_period: 30,
  order_id: 'Any configuration information'
})

form.valid?    #=> True/False
form.url       #=> URL
Recurring transactions:
form = Ccbill::DynamicPricing.new({
  initial_price_in_cents: 3000,
  initial_period: 30,
  recurring_price_in_cents: 100,
  recurring_period: 30,
  num_rebills: 99
  order_id: 'Any configuration information'
})

form.valid?    #=> True/False
form.url       #=> URL
To prefill the form you can pass additional variables like: customer_fname, customer_lname, address1, etc.
Full list of variables
Ccbill::DynamicPricing.new({
  ...
  customer_fname: 'Dmytro',
  customer_lname: 'Vasin',
  email: '[email protected]',
  city: 'Dnepr'
})
Controller and methods:
Before reading this part - please read Setup guide
rails generate ccbill:install will generate next:
  # config/routes.rb
  namespace :callbacks do
    resource :ccbill, only: [:show, :create]
  end
  # config/initializers/ccbill.rb
  CCBill.configure do |config|
    config.mode = :test
    config.salt = 'Encryption Key'
    config.default_currency = '840' # USD
    config.account = 'account_id'
    config.sub_account = '0000'
    config.flexform_id = 'flexform_id'
    config.min_price = '2.95'
    config.max_price = '100'
  end
  # app/controllers/callbacks/ccbills_controller.rb
  module Callbacks
    class CcbillsController < ApplicationController

      # GET: Redirect from payment system after approval/deny.
      def show
        case params[:mppResponse]
        when 'CheckoutSuccess'
          flash[:notice] = "Payment was successfully paid"
        when 'CheckoutFail'
          flash[:alert] = "Payment was declined. We're sorry"
        else
          fail 'Unknown mmpResponse'
        end

        redirect_to root_url
      end

      # POST: Webhooks
      def create
        begin
          # Your code goes here.
        rescue StandardError => error
          # I assume we should put `rescue` statement because CCBill will call our server again and again untill he will receive 200
          # When there was failure of sending webhooks or the system was under maintenance at the moment.
        end

        head :ok
      end

    end
  end
Payment Flow ( via DynamiPricing )
TL; DR;
- On the Site User clicks by generated link. After that user will be redirect to the
payment form - The
payment formis the CCBill form that will be displayed to customers after they choose to check out using CCBill. Thepayment formaccepts customer payment information - After processes the payment CCBill returns the customer to the Site through specified callbacks ( GET:
callbacks/ccbills#show) - Besides CCBill will produce another request ( Webhook request ) with status of the payment attempt. ( POST:
callbacks/ccbills#create)
Step 1:
- You should generate link.
That link should contains information about order/subscription or etc. ( What order exactly was paid )
This gem will help you in this case. Next script will generate link:
Ccbill::DynamicPricing.new({
  initial_price_in_cents: 355
  initial_period: 30,
  order_id: 'Any additional information'
}).url
This link contains variables: initial_price, initial_period and additional variable order_id.
To enhance security, generated url will contains formDigest value. The formDigest value is a hex-encoded MD5 hash, calculated using a combination of the fields and a salt value. Read More
Step 2:
- By clicking on this link user will be redirected to the CCBill
payment form.
This form was generated by the admin inside CCBill admin panel.
Find out more at Configure your CCBill Account section.
When user fill-in all fields. He can follow 2 way: Approve and Deny
But here is two thing:
- On
Denyresponse: App will propose to Try Again (User will stay at the payment system) - On
Denyresponse: App will receiveDenywebhook callback (callbacks/ccbills#create) that will containDenyattributes. - To Receive
Denyredirect user must do 3Denyattempt.
Explanation: The reason you aren’t redirected to denial URL is because our system sees these declines as ‘soft’ declines, and by default, you need to have at least 3 soft declines in a row until you are redirected to denial url. So if you want to test denial redirection, you will need to click ‘Try again’ and fill out the credit card number for three consecutive times and you will be redirected. If the consumer is ‘hard’ declined(for example transaction is denied by consumer’s bank), he would be redirected after first form submission. Additionally, we can turn off this rule to have soft denial three times before redirection and if you would like us to do so, please confirm.
- Test Cards
Test cards you can find here.
But one thing you should remember: OnlyCVVmetters:
Explanation: When performing test transactions in Sandbox mode, cvv2 higher then 300 will result in approval even though you used denial credit card. If you try to test it in live mode, you would receive denial no matter what cvv2 you are using.
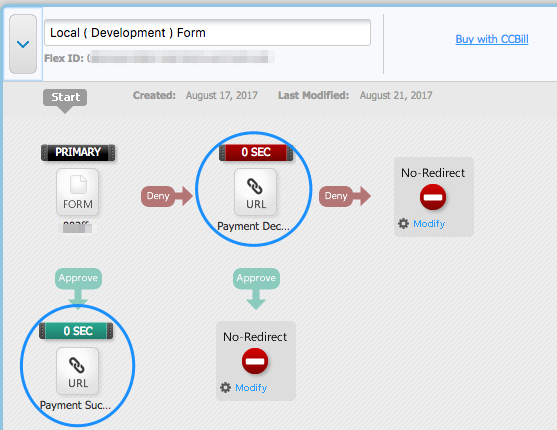
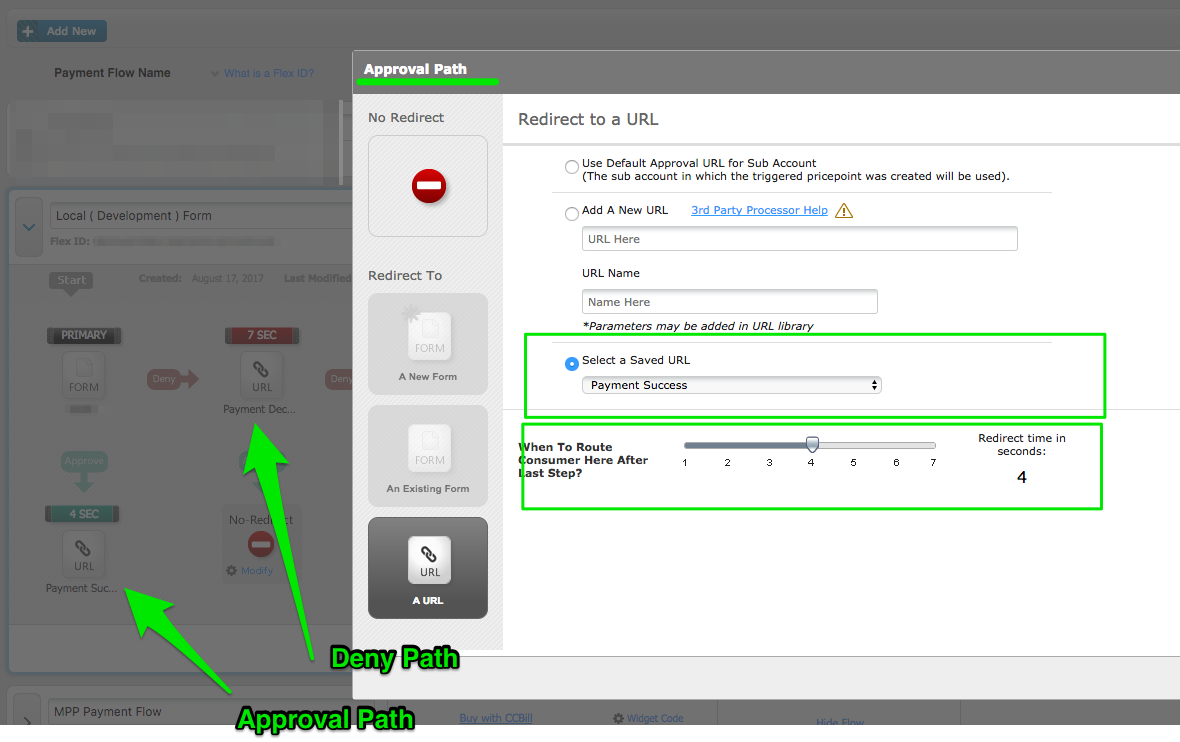
Approval Path and Deny Path was specified when we create FlexForm here
Approval Path
Customer will follow by this path if his transaction will be approved. You can find Approval Tile below the Primary and Deny Tile.
Deny Path
This is the path consumers take when they are declined on a transaction. They will be redirected to the deny path to try again. The Deny Tile is always to the right of the Primary Tile.
Step 3:
After previouse steps, ccbill redirects the customer to the Site through callbacks ( GET ) where you can catche the response and do proper redirect:
callbacks_ccbill GET /callbacks/ccbill(.:format) callbacks/ccbills#show
Step 4:
When a transaction is approved or denied, data will be sent to the Webhooks URL, if that event has been selected within the configuration. The data sent will include everything passed into the payment form along with the data entered into the payment form by the consumer, excluding payment information. This data can be parsed and handled
Webhook: According to POST action in your controller:
POST /callbacks/ccbill(.:format) callbacks/ccbills#create
Webhooks is some kind of background callback to the app that happens on each attempt to Pay.
This callback contains a lot of information of the attempt. For example: NewSaleSuccess
WebHooks vs Background Post When you use webhooks, there is no need to use Postback also. The main difference is that Postback only sends notifications for approved and denied transactions, and webhooks sends posts for all existing events, for example, renewal, cancellation, failed rebill, refund, chargeback, void, etc. The complete list of events can be found here
Setup guide
Instructions:
In order to set up a CCBill payment method, a CCBill Merchant account needs to be created.
Main Account
All CCBill clients have an account number for tracking purposes. The standard format is 9xxxxx-xxxx, where 6-digit number (9xxxxx) is the main account.
You can retrieve your main account number at the top bar near Client Account section.
Please enter the main account number to Main Account field.
Sub Account
After sign up for a website billing, you will be able to create a subaccount. The subaccount is a 4-digit number (xxxx) which is a part of main account.
To create a subaccount, go to Account Info menu item / Sub Account Admin section / Create Subaccount. After follow the instructions provided by CCBill to complete the subaccount.
Secret Key
You may obtain Salt value in 2 different ways:
- Contact CCBill Client Support and receive Salt value.
- You may create your own Salt value and provide it to CCBill Client Support.
Please note that Salt value is an alphanumeric string up to 32 characters long.
Form Secret Key ( flexform_id ):
In you CCBill Merchant Area you will be available to choose one of the CCBill Global Forms.
To retrieve one, go to Flexform System / FlexForm Payment Links. After click on Forms Library. Here will be displayed all forms that already in use (If you see nothing - that means you should create at least one Payment Flow )
After select an appropriate form you can customize it and preview it. ( How to customize form look into FAQ of the CCBill )
Callbacks URLs:
Success and Failure callback URLs need to be set up.
This urls you can setup at:
- click Account Info
- click Sub Account Admin
- select Any subaccount
- click Advansed section
- Set Approval Post URL and Denial Post URL
For local machine ( development env ) I use Ngrok to set valid path.
Important! You gotta be logged in to the CCBill admin to be able to see your forms in the sandbox.
Configure your CCBill Account:
The following CCBill settings must be correct for the payment module to work correctly.
Dynamic Pricing
Please work with your CCBill support representative to activate Dynamic Pricing for your account ( sub-account ). You can verify that Dynamic Pricing is active at Account Info > Manage the subaccount menu > Pick 0000 subaccount from select menu > Feature Summary at the bottom. in the Admin Portal. Your Dynamic Pricing status appears at the bottom of the Billing Tools section.
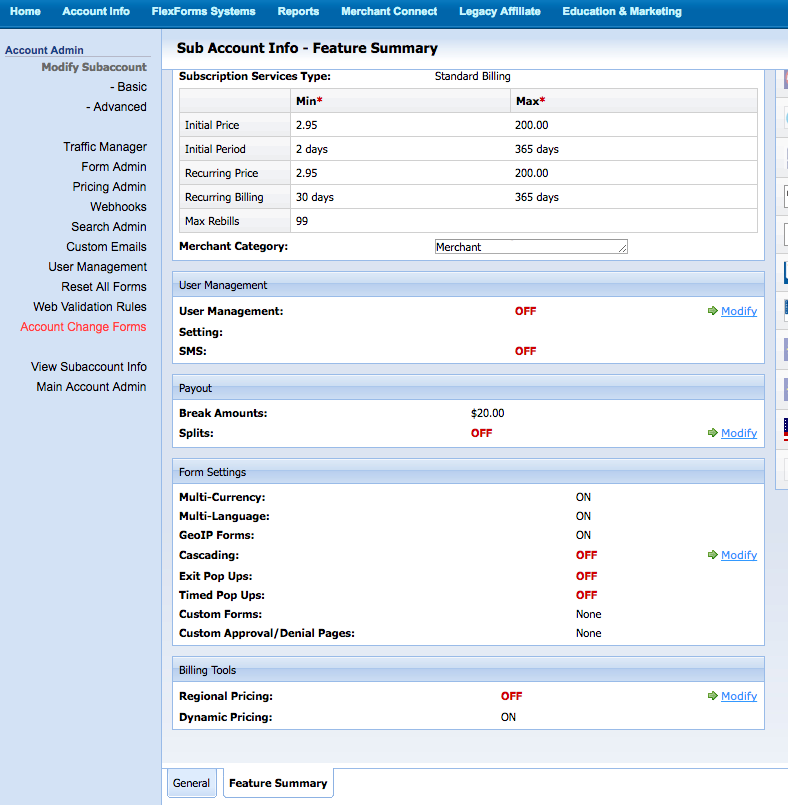
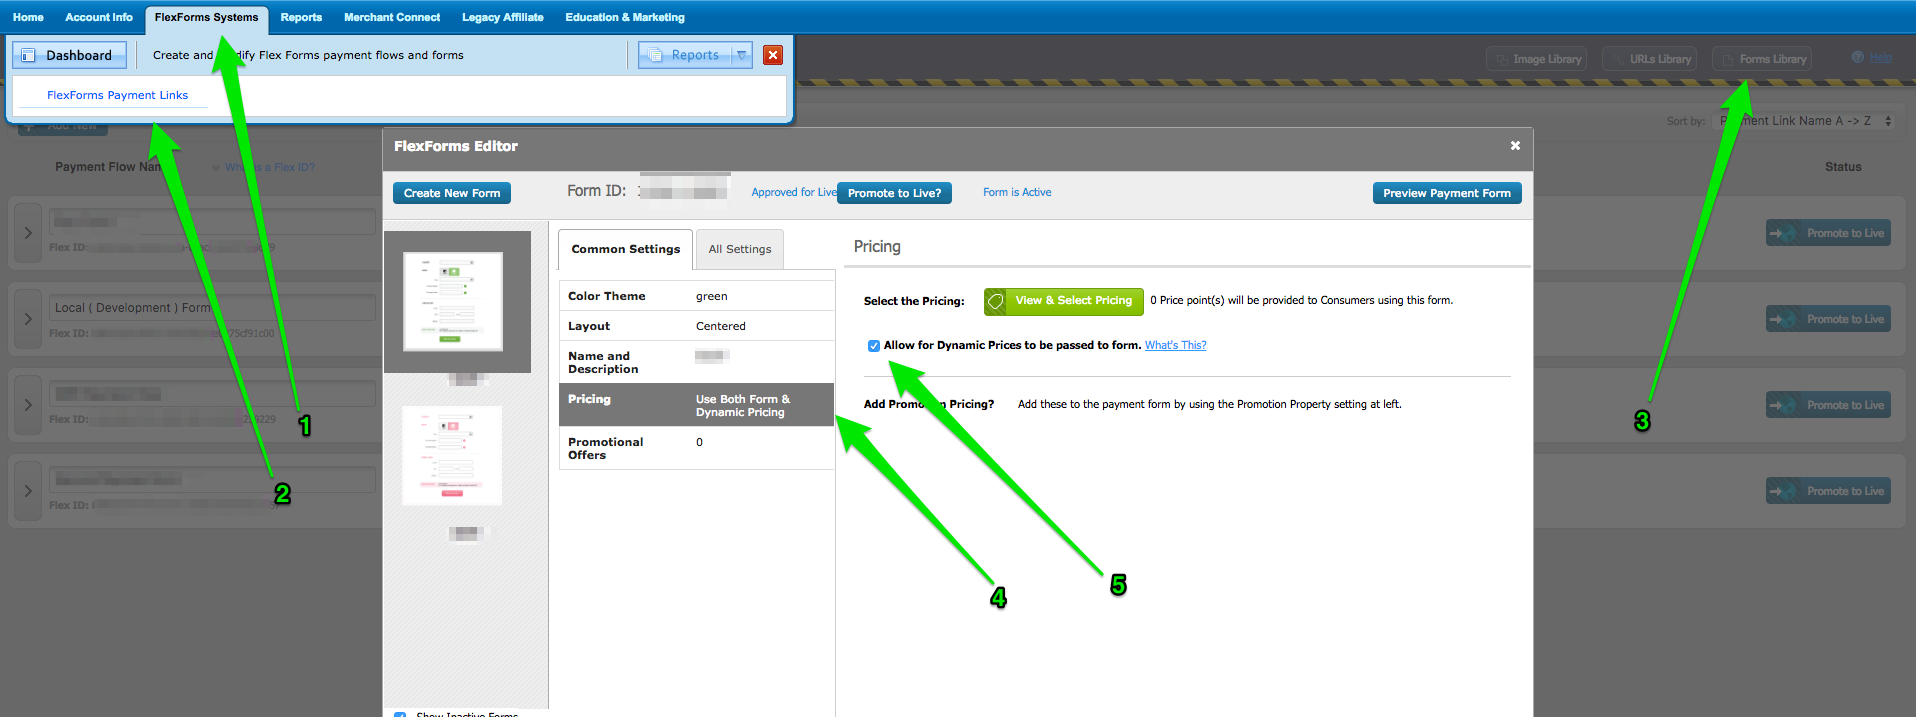
Please note that if Dynamic Pricing is enabled on the subaccount level, ALL signup forms on that subaccount must use Dynamic Pricing in order to function correctly. This includes forms created on the subaccount prior to Dynamic Pricing being enabled. If Dynamic Pricing is enabled only on a particular form and not the entire subaccount, other forms on that subaccount will not be required to use Dynamic Pricing.
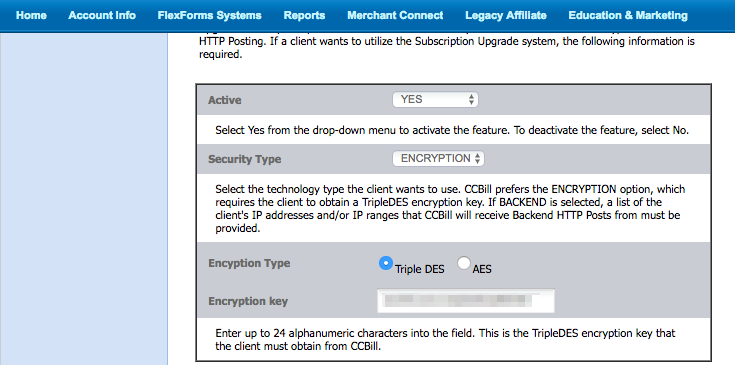
Creating a Salt / Encryption Key
A "salt" is a string of random data used to make your encryption more secure. Sub Account Admin > Advanced. It will appear in the Encryption Key field of the Upgrade Security Setup Information section.
Make note of the Salt: this value will be entered into the your configuration file. ( config/initializers/ccbill.rb )
Disabling User Management
Since this sub-account will be used for Dynamic Pricing transactions (not managing user subscriptions), User Management must be disabled.
- Sign in to the Admin Portal.
- On the Account Info megamenu, click Sub Account Admin, then User Management on the left menu.
- Select Turn off User Management in the top section.
- Select Do Not Collect Usernames and Passwords in the Username Settings section.

Creating a New FlexForms Payment Form
Here is standart Getting Started with Flex Froms.
Visit FlexForms:
- Ensure All is selected in the top Client Account drop-down menu. FlexForms are not specific to sub accounts, and cannot be managed when a sub account is selected.
- Navigate to the
FlexForms Systemstab in the top menu bar and selectFlexForms Payment Links. All existing forms will be displayed in a table. - Make sure that you in sendbox ( Top left corner )
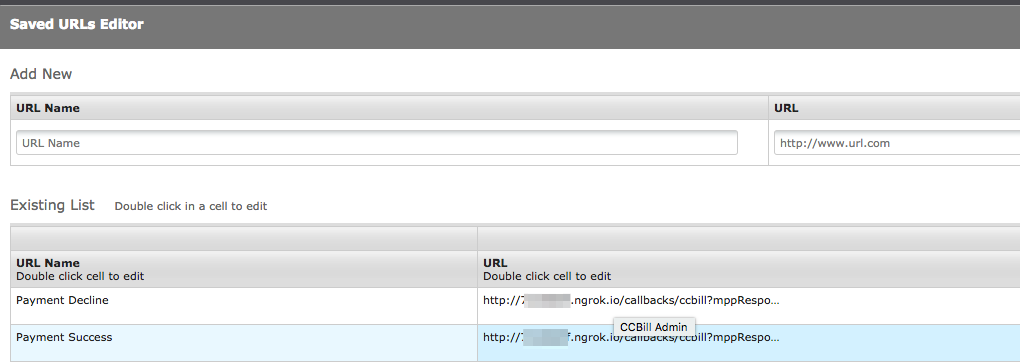
Create Library of URLs (Approval and Deny)
- Click the URLs Library button in the upper-right to create a new URL. The Saved URLs Editor dialog displays.
- Create Payment Success URL
- Use the fields under Add New to create a new URL with the following properties.
- URL Name. Enter a meaningful name for this URL. Forexample: Payment Success
- URL. Under URL, enter the base URL for your Site store. Forexample:
http://[SiteHost or Ngrok]/callbacks/ccbill?mppResponse=CheckoutSuccess
- Create Payment Decline URL. Forexample:
http://[SiteHost or Ngrok]/callbacks/ccbill?mppResponse=CheckoutFail - Click Save to commit your changes.
Important:
- This is URLS ( GET ) will be used to specify where CCBill should redirect User after success/deny payment.
- We set
mppResponse=CheckoutSuccessandmppResponse=CheckoutFailbecause we use this attribute atcallbacks/ccbills#showaction to determine kind of response (success/fail).
Create a New FlexForm
- Click the Add New button in the upper-left to create a new form.
- The A New Form dialog is displayed:
- Payment Flow Name. At the top, enter a name for the new payment flow (this will be different than the form name, as a single form can be used in multiple flows). Forexample: 'Dev Form'
- Form Name. Under Form Name, enter a name for the form. Forexample: '001ff'
- Dynamic Pricing. Under Pricing, check the box to enable dynamic pricing.
- Layout. Select your desired layout
- Save the form
- Edit the Flow
- Approval redirect to the Site
- Click the arrow button to the left of your new flow to view the details. Approval Tile.
- Under the green Approve arrow, click the square to modify the action.
- Approval URL. In the left menu, select A URL. Select Select a Saved URL and select the URL your created earlier (e.g. Payment Success).
- Redirect Time. Select a redirect time of 1 second using the slider at the bottom and save the form. ( e.g. 4 seconds )
- Deny redirect to the Site
- Under the red Deny arrow, click the square to modify the action. Deny Tile.
- Approval URL. In the left menu, select A URL. Select Select a Saved URL and select the URL your created earlier (e.g.
Payment Decline). - Redirect Time. Select a redirect time of 1 second using the slider at the bottom and save the form. ( e.g. 7 seconds )
- Flex ID. Make note of the Flex ID: this value will be entered into the your configuration file. (
config/initializers/ccbill.rb)
You may read how to setup instant redirect here
Important: Do not create alot of FlexForm's. You can't delete them!
Webhooks
In your CCBill admin interface, navigate to Sub Account Admin section, select Webhooks from the left menu.
Fill in Webhook URL text box with the http://[SiteHost or Ngrok]/callbacks/ccbill url. CCBill will call specified URL in background.
Make sure to check 'all' check boxes on this page and pick JSON Webhook Format
Note: That will be POST request.
In our case It will call callbacks/ccbills#create action.
In this action based on params we will find-out what request was called.

:sparkles: Your CCBill account is now configured :sparkles:
Price Restrictions
Price Minimums and Maximums
All Merchants are assigned a default structure in line with the following:
Pricing
Minimum: $2.95 USD
Maximum: $100.00 USD
Time Periods
Initial Period: 2-365 Days
Rebill Period: 30, 60, or 90 Days
Changes to your available price ranges require upper management approval. If you would like to make changes, please contact CCBill Merchant Support. We'll talk to you about the changes you want and submit your request to the right people. This process can take one or two business days to complete.
Response Digest Value:
In Dynamic Pricing article was described that you can test digest value from response. That is true ONLY for production mode. In test mode digets value is not match.
Gem allows you to test that via:
postback = CCBill::Postback.new(params)
postback.verified?    #=> True/False
Important! This method work only in 'non-test' mode. Important! This method work only for
NewSaleSuccessandNewSaleFailure
Go To LIVE:
The LINKS that you get from the Sandbox Mode page are different from the links that you get from the Live Mode page
Do not forget to create another FlexForm for the production env.
Please read next:
Dev Expirience:
- Ngrok. For the local machine use
ngrokto set real links from the Ccbill. - Deny/Approval paths - Write to support to set "Redirect time in seconds:" to "Immediately". Without this option after approve/deny user will be redirected to the blank page with the URL of redirect ( image below ) and that page can't be customized, with this option user will instantly be redirected.

- Check transactions: Admin are able to check the number and amount of test transactions you had in selected timeframe. In order to do so, please navigate to Reports >> Alphabetical list >> C >> Credit/check transactions >> select date range and select Test transactions from Options dropdown menu.
- All prices must be between $2.95 and $100
- In development mode you can't check transaction from the point 3.
- Test transaction can't be "cancelled, void, etc". The only way you could test is to use real credit card and then refund the subscription after it rebills. Personnaly I tested only NewSaleSuccess, NewSaleFailure responses.
- All received responses I attached to the Responses. ( I little bit changed own info )
- Response Digest Value. In Dynamic Pricing article was described that you can test digest value from response. That is true ONLY for
productionmode. In test mode digets value is not match. - Do not create alot of FlexForm's. You can't delete them
Useful Links:
- Dynamic Pricing
- FlexForm FAQs
- FlexForms Quick Start Guide
- FlexForms Sandbox
- FlexForms Form Status and Live Mode
- Test Transactions and Credit Cards
- Webhooks - prefil variables
- Price Minimums and Maximums
- Responses
TODO: Datalink.
License
The gem is available as open source under the terms of the MIT License.